在使用 F5 Distributed Cloud Service (以下簡稱 XC) 發布 Kubernetes 集群服務時,我們面臨的首要挑戰是 Pod IP 的動態特性。由於 Pod 的生命週期短暫且 IP 隨時可能變動,XC 必須具備自動發現集群內服務的能力,才能順利完成服務發布、健康狀態監控及負載平衡等關鍵任務。
本文將深入探討 F5 XC 在 OpenShift 環境中的整合實踐,並透過實戰演練展示如何構建一個安全、高效的混合雲應用交付架構。
關鍵機制:Service Discovery 與地雲整合 #
F5 XC 在 OpenShift 集群中實踐服務發現 (Service Discovery) 主要有兩種途徑,其核心差異在於 Cloud Mesh (舊稱 Voltmesh) 的部署位置與數據轉發方式:
方法 1:In-Cluster Deployment (Cloud Mesh as Pod) #
將 Cloud Mesh 直接部署在集群內,這也是 F5 XC 所稱的 Kubernetes Site 模式。
- 通訊與轉發:Cloud Mesh 以 Pod 形式運行,直接與 Kube-API 溝通並在集群內網轉發流量。
- 實戰採用:本文將採用此架構進行演示。
- 注意事項:此模式目前支援的 Kubernetes 平台有限,部署前建議查閱 Kubernetes Site 確認相容性。
方法 2:External Deployment (Kubeconfig Integration) #
使用 F5 XC 的 Service Discoveries 功能。
- 通訊方式:需上傳
kubeconfig檔案,讓位於集群外部的 Cloud Mesh 能與 Kube-API 溝通。 - 數據轉發:流量需透過 NodePort 轉發進入集群。

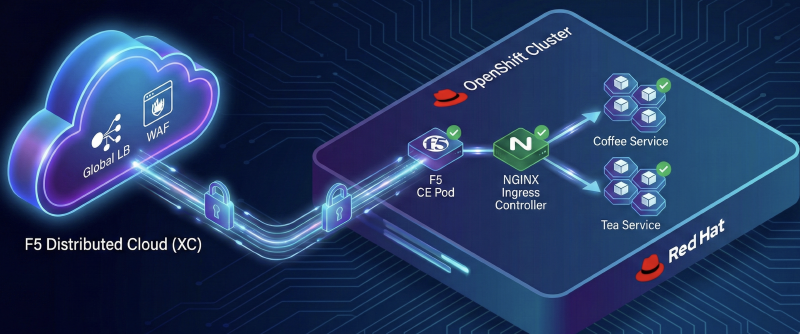
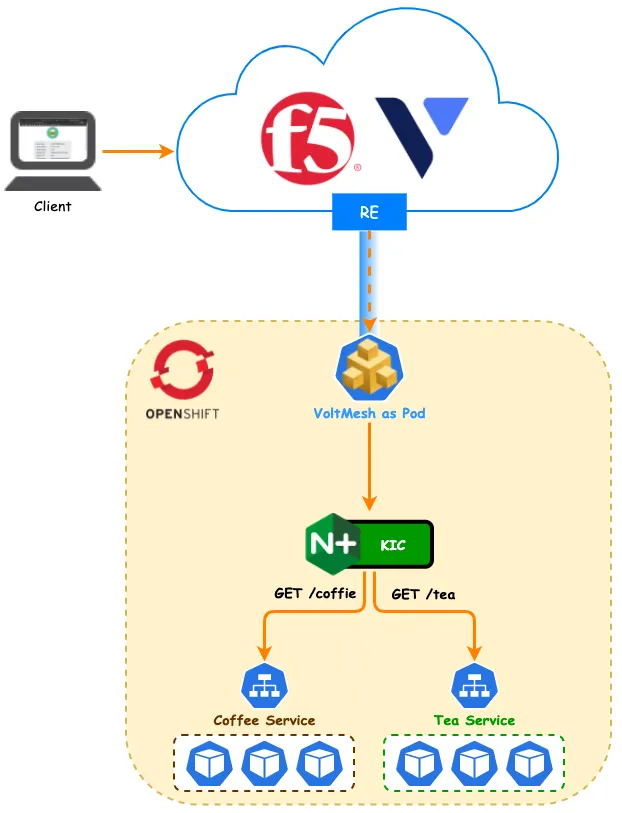
架構設計:混合雲部署拓撲 #
本次實戰採用 Cloud Mesh as Pod 的部署模式。
- F5 XC (Cloud Mesh):部署於集群內,負責服務發現與初步流量接入。
- F5 DSC:負責全域負載平衡,將流量導向 NGINX Ingress Controller。
- NGINX Ingress Controller (IC):負責 L7 路徑路由 (Path Routing),將流量精準分發至後端的服務 Pod。
- 安全性:開啟 F5 WAF 功能,為應用提供網頁應用程式防火牆防護。
實戰演練:環境建置與應用發布 #
接下來,我們將一步步完成從環境建置到應用發布的完整流程。
1. 建立 Kubernetes Site #
首先,我們需要在 F5 XC Console 上建立一個 Site,並在 OpenShift 集群中安裝對應的元件。
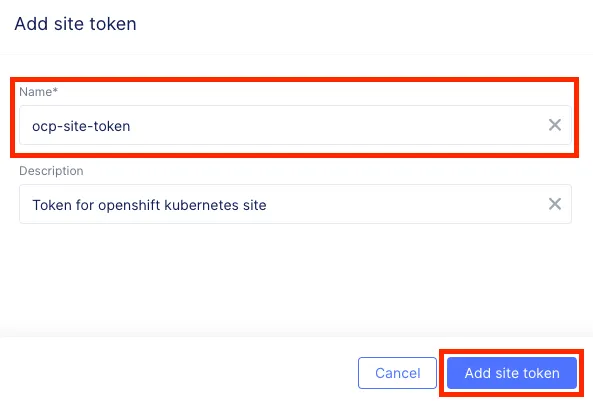
Step 1: 新增 Site Token
登入 F5 XC Console:Cloud and Edge Sites > Manage > Site Management > Site Tokens
輸入自定義名稱後,系統將生成一組 Token。
Step 2: 部署 CE YAML
在 OpenShift 集群中套用以下 YAML,這將部署 ves-system 命名空間及相關的 Cloud Mesh 元件。請務必將 Token 欄位替換為上一步驟取得的值,並根據實際環境調整 Latitude (緯度) 與 Longitude (經度)。
apiVersion: v1
kind: Namespace
metadata:
  name: ves-system
---
apiVersion: v1
kind: ServiceAccount
metadata:
  name: volterra-sa
  namespace: ves-system
---
apiVersion: rbac.authorization.k8s.io/v1
kind: Role
metadata:
  name: volterra-admin-role
  namespace: ves-system
rules:
- apiGroups: ["*"]
  resources: ["*"]
  verbs: ["*"]
---
apiVersion: rbac.authorization.k8s.io/v1
kind: RoleBinding
metadata:
  name: volterra-admin-role-binding
  namespace: ves-system
subjects:
- kind: ServiceAccount
  name: volterra-sa
  apiGroup: ""
  namespace: ves-system
roleRef:
  kind: Role
  name: volterra-admin-role
  apiGroup: rbac.authorization.k8s.io
---
apiVersion: apps/v1
kind: DaemonSet
metadata:
  name: volterra-ce-init
  namespace: ves-system
spec:
  selector:
    matchLabels:
      name: volterra-ce-init
  template:
    metadata:
      labels:
        name: volterra-ce-init
    spec:
      hostNetwork: true
      hostPID: true
      serviceAccountName: volterra-sa
      containers:
      - name: volterra-ce-init
        image: docker.io/volterraio/volterra-ce-init
        volumeMounts:
        - name: hostroot
          mountPath: /host
        securityContext:
          privileged: true
      volumes:
      - name: hostroot
        hostPath:
          path: /
---
apiVersion: v1
kind: ServiceAccount
metadata:
  name: vpm-sa
  namespace: ves-system
---
apiVersion: rbac.authorization.k8s.io/v1
kind: Role
metadata:
  name: vpm-role
  namespace: ves-system
rules:
- apiGroups: ["*"]
  resources: ["*"]
  verbs: ["*"]
---
apiVersion: rbac.authorization.k8s.io/v1
kind: RoleBinding
metadata:
  name: vpm-role-binding
  namespace: ves-system
subjects:
- kind: ServiceAccount
  name: vpm-sa
  apiGroup: ""
  namespace: ves-system
roleRef:
  kind: Role
  name: vpm-role
  apiGroup: rbac.authorization.k8s.io
---
apiVersion: rbac.authorization.k8s.io/v1
kind: ClusterRoleBinding
metadata:
  name: ver
roleRef:
  apiGroup: rbac.authorization.k8s.io
  kind: ClusterRole
  name: cluster-admin
subjects:
- kind: ServiceAccount
  name: ver
  namespace: ves-system
---
apiVersion: v1
kind: ConfigMap
metadata:
  name: vpm-cfg
  namespace: ves-system
data:
 config.yaml: |
  Vpm:
    # 自定義 Kubernetes site 名稱
    ClusterName: ocp-ver-cluster
    ClusterType: ce
    Config: /etc/vpm/config.yaml
    DisableModules: ["dictator", "recruiter"]
    # 緯度
    Latitude: 25
    # 經度
    Longitude: 121
    MauriceEndpoint: https://register.ves.volterra.io
    MauricePrivateEndpoint: https://register-tls.ves.volterra.io
    PrivateNIC: eth0
    SkipStages: ["osSetup", "etcd", "kubelet", "master", "voucher", "workload", "controlWorkload"]
    # 於步驟一創建出來的 Token
    Token: xxxxxxxx-xxxxxxx-xxxxxxx-xxxxxx
    CertifiedHardware: k8s-voltmesh
---
apiVersion: apps/v1
kind: StatefulSet
metadata:
  name: vp-manager
  namespace: ves-system
spec:
  replicas: 1
  selector:
    matchLabels:
      name: vpm
  serviceName: "vp-manager"
  template:
    metadata:
      labels:
        name: vpm
        statefulset: vp-manager
    spec:
      serviceAccountName: vpm-sa
      initContainers:
      - name : vpm-init-config
        image: busybox
        volumeMounts:
        - name: etcvpm
          mountPath: /etc/vpm
        - name: vpmconfigmap
          mountPath: /tmp/config.yaml
          subPath: config.yaml
        command:
        - "/bin/sh"
        - "-c"
        - "cp /tmp/config.yaml /etc/vpm"
      containers:
      - name: vp-manager
        image: docker.io/volterraio/vpm
        imagePullPolicy: Always
        volumeMounts:
        - name: etcvpm
          mountPath: /etc/vpm
        - name: varvpm
          mountPath: /var/lib/vpm
        - name: podinfo
          mountPath: /etc/podinfo
        - name: data
          mountPath: /data
        securityContext:
          privileged: true
      terminationGracePeriodSeconds: 1
      volumes:
      - name: podinfo
        downwardAPI:
          items:
            - path: "labels"
              fieldRef:
                fieldPath: metadata.labels
      - name: vpmconfigmap
        configMap:
          name: vpm-cfg
  volumeClaimTemplates:
  - metadata:
      name: etcvpm
    spec:
      # 自定義存儲
      storageClassName: nutanix-volume
      accessModes: [ "ReadWriteOnce" ]
      resources:
        requests:
          storage: 1Gi
  - metadata:
      name: varvpm
    spec:
      # 自定義存儲
      storageClassName: nutanix-volume
      accessModes: [ "ReadWriteOnce" ]
      resources:
        requests:
          storage: 1Gi
  - metadata:
      name: data
    spec:
      # 自定義存儲
      storageClassName: nutanix-volume
      accessModes: [ "ReadWriteOnce" ]
      resources:
        requests:
          storage: 1Gi
---
apiVersion: v1
kind: Service
metadata:
  name: vpm
  namespace: ves-system
spec:
  type: NodePort
  selector:
    name: vpm
  ports:
  - protocol: TCP
    port: 65003
    targetPort: 65003
等待 Pod 初始化完成:
[root@bastion01 ~]# oc get pods -n ves-system
NAME                    READY   STATUS   RESTARTS   AGE
volterra-ce-init-k4rc7  1/1     Running  0          89s
volterra-ce-init-zcznx  1/1     Running  0          89s
vp-manager-0            1/1     Running  0          42s
Step 3: 完成註冊
回到 F5 XC Console:Cloud and Edge Sites > Manage > Site Management > Registrations
核准新出現的註冊請求。
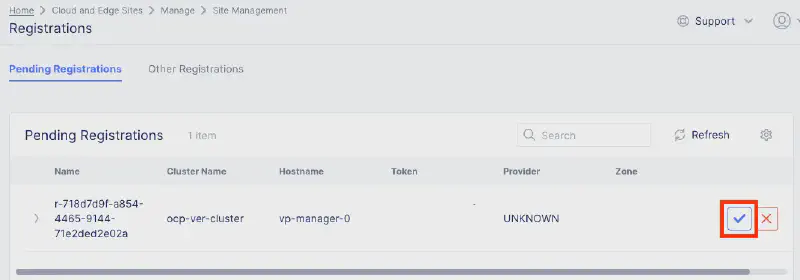
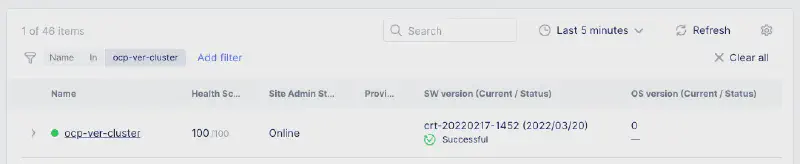
等待部署完成並確認 Site 狀態顯示為綠燈 (Online)。
2. DNS 委派 (DNS Delegation) #
F5 XC 支援代管權威網域,這是目前建議的管理方式。
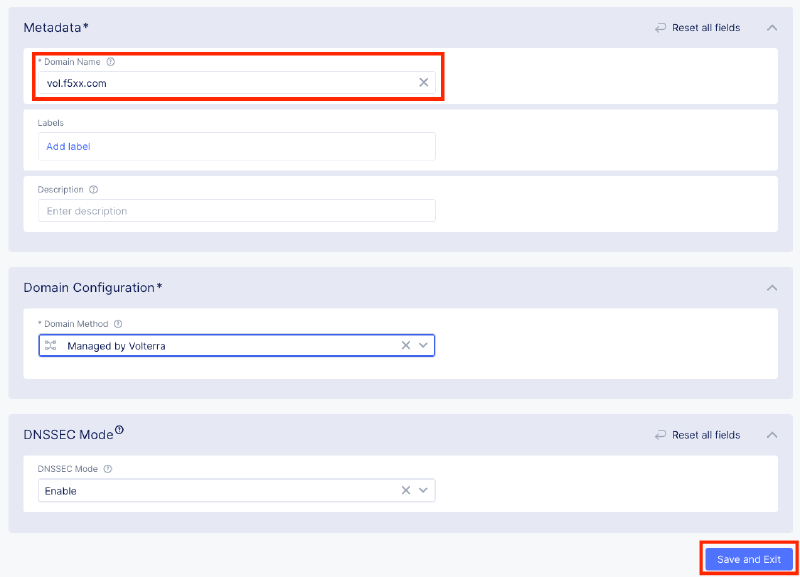
Step 1: 新增委派網域
F5 XC Console:DNS Management > Domain Management > Zone Management
輸入子網域名稱,並視需求啟用 DNSSEC。
Step 2: 驗證與設定
依照指示完成 TXT 紀錄驗證,並在您的網域註冊商處新增 NS 紀錄指向 F5 XC。

3. 部署應用與 Ingress 資源 #
Step 1: 部署測試應用 (Coffee & Tea)
我們部署兩個簡單的服務 coffee 與 tea 作為測試標的。
apiVersion: apps/v1
kind: Deployment
metadata:
  name: c
spec:
  replicas: 3
  selector:
    matchLabels:
      app: coffee
  template:
    metadata:
      labels:
        app: coffee
    spec:
      containers:
      - name: coffee
        image: ingress-demo
        ports:
        - containerPort: 80
---
apiVersion: apps/v1
kind: Deployment
metadata:
  name: tea
spec:
  replicas: 3
  selector:
    matchLabels:
      app: tea
  template:
    metadata:
      labels:
        app: tea
    spec:
      containers:
      - name: tea
        image: ingress-demo
        ports:
        - containerPort: 80
---
apiVersion: v1
kind: Service
metadata:
  name: coffee-svc
spec:
  ports:
  - port: 80
    targetPort: 80
    protocol: TCP
    name: http
  selector:
    app: coffee
---
apiVersion: v1
kind: Service
metadata:
  name: tea-svc
spec:
  ports:
  - port: 80
    targetPort: 80
    protocol: TCP
    name: http
  selector:
    app: tea
Step 2: 部署 NGINX VirtualServer
使用 NGINX CRD VirtualServer 定義路由規則。
kind: VirtualServer
metadata:
  name: cafe-vol-vs
spec:
  host: cafe.vol.f5xx.com
  upstreams:
  - name: tea
    service: tea-svc
    port: 80
    healthCheck:
      enable: true
      path: /tea
      # ... (健康檢查參數) ...
  - name: coffee
    service: coffee-svc
    port: 80
    healthCheck:
      enable: true
      path: /coffee
      # ... (健康檢查參數) ...
  routes:
  - path: /tea
    action:
      pass: tea
  - path: /coffee
    action:
      pass: coffee
Step 3: 確認部署狀態
[root@bastion01 ~]# oc get vs,pods
NAME            STATE   HOST               IP   PORTS   AGE
vs/cafe-vol-vs  Valid   cafe.vol.f5xx.com               6d21h
4. 建立負載平衡器 #
我們使用 Terraform 來自動化建立 Origin Pool 與 HTTP Load Balancer,這有利於未來的 CI/CD 整合。
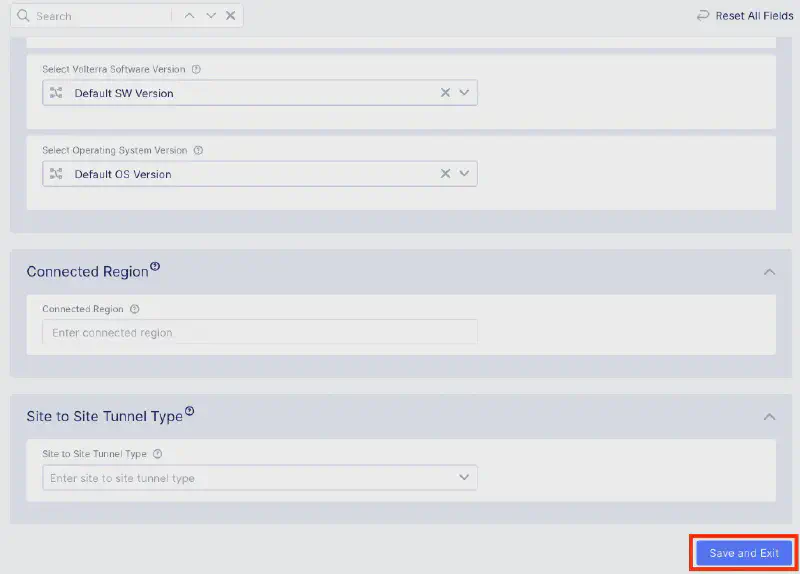
Step 1: Terraform 配置
此配置將建立一個 Origin Pool 指向 K8s 內的 NGINX Ingress Service,並建立一個 HTTP LB 對外發布服務,同時開啟 WAF 防護與自動憑證簽發。
terraform {
  required_providers {
    volterra  = {
      source  = "volterraedge/volterra"
      version = "0.11.6"
    }
  }
}

provider "volterra" {
  api_p12_file = "my.api-creds.p12"   ### Voltconsole 中創建並下載 API Credentials
  url          = "https://my.console.ves.volterra.io/api"
}

# 新增 Origin Pool
resource "volterra_origin_pool" "nginx-kic-pool" {
  name                   = "nginx-kic-pool"
  namespace              = "prod"
  endpoint_selection     = "LOCAL_PREFERRED"
  loadbalancer_algorithm = "LB_OVERRIDE"
  port                   = "80"
  no_tls                 = true

  origin_servers {
    # 使用 K8s 服務發現
    k8s_service {
      # 格式為 service_name.namespace
      service_name = "nginx-ingress.nginx-ingress"
      site_locator {
        site {
          tenant     = "partners-taiwan-scdtfhwu"
          name       = "ocp-ver-cluster"
          namespace  = "system"
        }
      }
      outside_network = true
    }
  }

  healthcheck {
    # 健康檢查方式
    name = "tcp-k8s-monitor"
  }
}

# 新增 HTTP Loadbalancer
resource "volterra_http_loadbalancer" "cafe-lb" {
  name      = "cafe-lb"
  namespace = "prod"
  domains   = ["cafe.vol.f5xx.com"]
  advertise_on_public_default_vip = true
  add_location = true

  # 開啟自動簽發憑證
  https_auto_cert {
    http_redirect = true
    add_hsts      = true
    no_mtls       = true
    tls_config {
      default_security = true
    }
    default_header = true
    enable_path_normalize = true
  }

  # 預設 Origin Pool
  default_route_pools {
    pool {
      name = "nginx-kic-pool"
    }
    priority = 1
    weight   = 1
  }

  # 改寫 Hostname 路由規則
  routes {
    simple_route {
      http_method = "ANY"
      host_rewrite = "cafe.vol.f5xx.com"
      path {
        prefix = "/"
      }
      origin_pools {
        pool {
          name = "nginx-kic-pool"
        }
        priority = 1
        weight   = 1
      }
    }
  }

  # 開啟 WAF 等安全功能
  app_firewall {
    name = "block-app-firewall"
  }

  depends_on = [volterra_origin_pool.nginx-kic-pool]
}
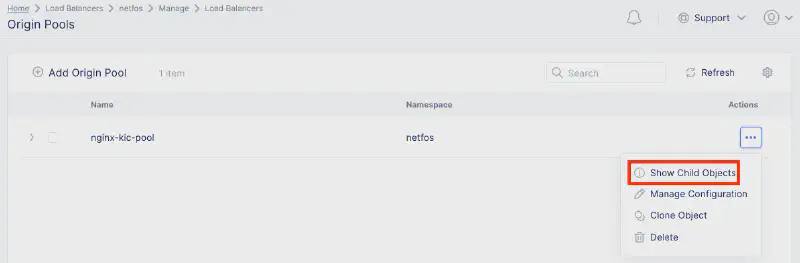
Step 2: 確認設定與健康狀態
執行 Terraform Apply 後,在 Console 確認 LB 與 Origin Pool 已建立。
檢查 Origin Pool 的 health_status,確認 F5 XC 已成功發現並連接到 K8s 內的 Pod IP。
驗證測試:服務交付與安全防護 #
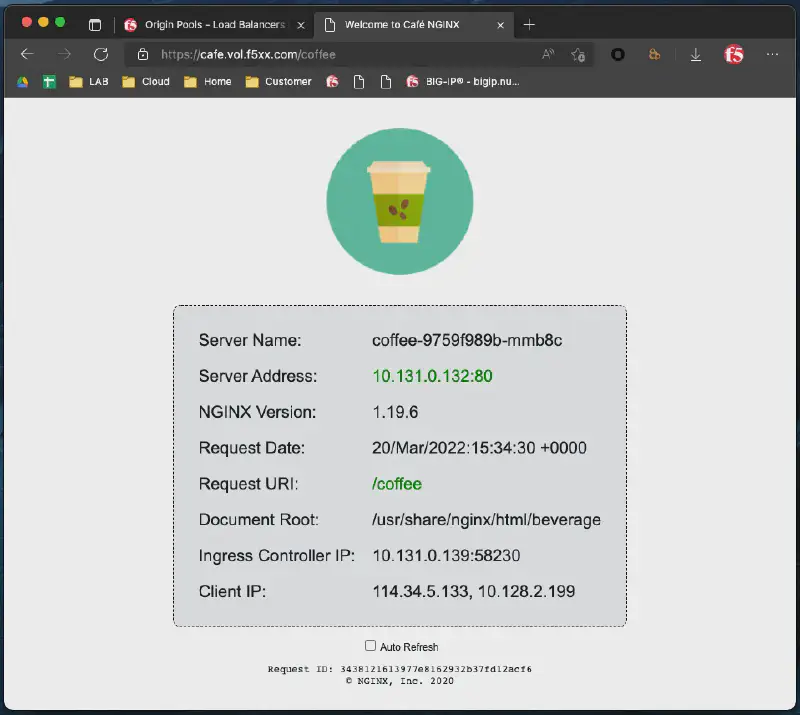
應用存取測試 #
存取 https://cafe.vol.f5xx.com/coffee,確認能正確顯示應用頁面。
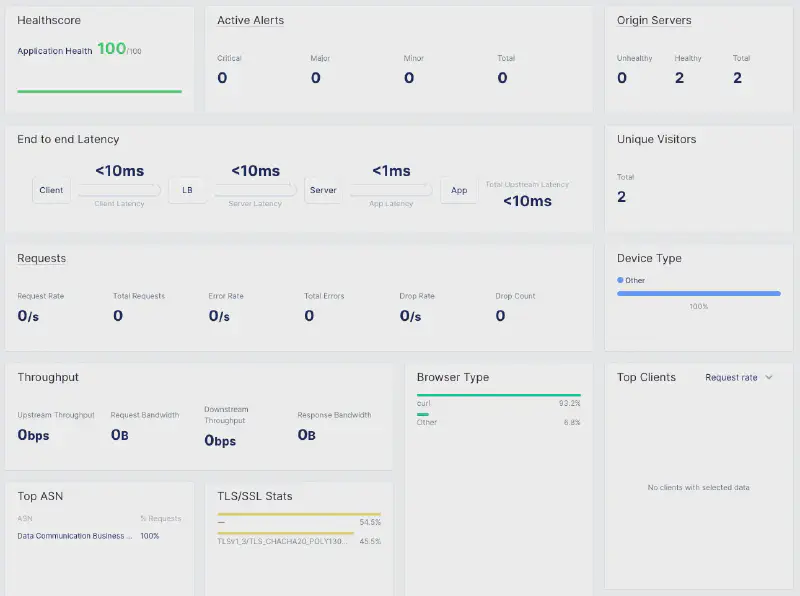
在 F5 XC Console 的 Dashboard 中,可以即時監控延遲、吞吐量及 TLS 加密套件等指標。
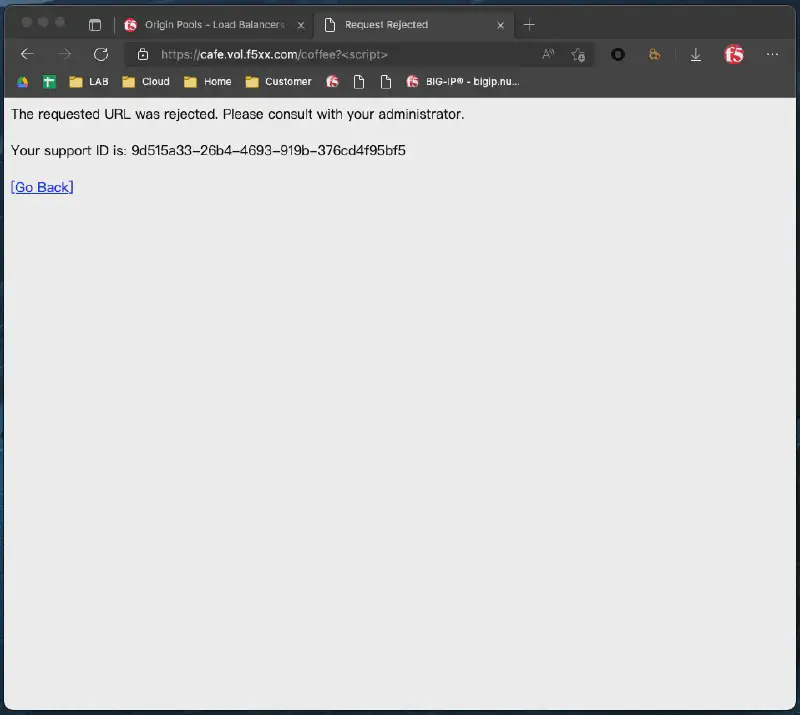
安全性測試 #
嘗試發送帶有攻擊特徵的請求(例如 SQL Injection 測試字串),確認請求被 F5 WAF 阻擋。 在 Security Dashboard 中,可以查看到詳細的攻擊日誌,包含來源 IP、攻擊類型及被觸發的 WAF 規則。